jQuery tools basics
In this document
This document describes common practices for each of the tools such as:
The role of HTML
jQuery Tools was primarily developed for "normal" HTML developers. You either have an existing website or are starting with a new one and these tools are used to enhance it. The goal here is to use "progressive enhancement" so that browsers that do not support JavaScript at all can still visualize your content.
These tools are not bound to any specific HTML structure. For example, tabs can be constructed from ul, ol, dl, div or table elements. The same is true of our other jQuery Tools as well. The most important thing is to understand what you are doing and what HTML element is suitable for which specific situation.
All of the tools deal with a root element which is typically a div element, but it does not have to be. For example, a root element for an overlay is the one that contains all overlayed data. In every tool you can have any combination of HTML inside the root element such as images, forms, Flash objects and tables.
The role of JavaScript and jQuery
jQuery is a fast and concise JavaScript library that simplifies the development of cross-browser applications. All tools except flashembed are dependent on this library. jQuery skills are not required when using these tools. People have been using these tools without any prior knowledge about jQuery and even JavaScript itself. Of course, those skills would be a great help, but they are not required.
If you want to enhance your jQuery and JavaScript skills, the best things to learn about when using these tools would definitely be jQuery selectors and object literals. The first skill is used to select elements from the page to be enhanced with the tools and the latter is used for configuring the tools. Here is an example that introduces you to both of these skills:
  // two jquery selectors and a configuration given as an object literal
  $("#content ul.tabs").tabs("div.panes > div", {

  // configuration variables
  current: 'current',
  effect: 'fade'

  });
Here we have two jQuery selectors. The first one selects all ul elements whose class name is tabs which are all contained inside an element whose id is "content". This query is similar to CSS selectors and if you know CSS, you will feel at home here. The second selector selects all div elements that are directly nested inside a div whose class name is panes.
Finally, we have a configuration object starting with { and ending with }. It contains a comma-separated list of name-value pairs. The name is followed by a colon which is followed by a value. The value can be a number, string, boolean, array, function or another object literal. Care must be taken to enclose string values in quotes. That is about it. You use this syntax to configure these tools.
Execute your scripts when the document is ready
It is important that you execute all your scripts only after the document is ready and scriptable. This can be done by enclosing your JavaScript calls inside a $(document).ready() block as follows:
  $(document).ready(function() {

  // put all your JavaScript wizardry here

  });
This might be the most important thing in jQuery. Everything inside the block will load as soon as the document is scriptable but before the whole page contents such as images and Flash are loaded. Everything that you stick inside the braces is ready to go at the earliest possible moment. And as opposed to the traditional old-school "onload" attribute in the body tag you can have multiple $(document).ready() blocks on your page.
You can also use a shorter syntax:
  $(function() {

  // same thing here.

  });
Which does exactly the same thing but is not so intuitive for a newcomer.
The role of CSS
Cascaded Style Sheets (CSS) are the industry standard for styling the presentation and positioning of your elements. It is a powerful language which can do many things that surprise even experienced web developers. Learning this skill is definitely encouraged for every web developer.
These tools are very strict about not mixing any style declarations in the JavaScript code. You would think that this is an obvious coding principle and should be taken for granted but it isn't. Taking a quick look at the list of jQuery plugins reveals many tools that mix CSS into their code and hard code their style. Even if those styling variables are given as configuration variables, be it borders, images, colors, size or positioning, this leads to poor application design.
A proper tool should only rely on CSS class names - because they offer a much more flexible styling environment. Let's take the tabs tool as an example. It offers a configuration variable called current representing a class name that is set to the currently active tab. Lets say you have set the value "active" as follows:
$("ul.tabs").tabs("div.panes > div", {current: 'active'});
After that you can style the current tab with CSS as follows:
  ul.tabs .active {
  color: '#fff';
  fontWeight: bold;
  background-position:0 -40px;
  }
This means that you can have a whole CSS arsenal at your disposal while designing what the currently selected tab should look like. This kind of design principle is used throughout these tools. There are no hidden surprises in the tools related to styling. The tools are responsible for setting and removing classes from elements and after that all style is the responsibility of CSS. You can also customize all class names that these tools use.
Default CSS files
For each tool we offer a default CSS file that you can use as the basis for your design. You can use the code, images and ideas from there for free. No obligations. They are fully documented and coded with good CSS practices. For example, you will never see this kind of statement:
  /* define colors for body and p elements */
  body {
  color:#ccc;
  }

  p {
  color:#ccc;
  }
Instead it will always be shortened to:
  body, p {
  color:#ccc;
  }
This was just a primitive example of good CSS practice, but it is used extensively in our CSS files.
Graphic design and presentation
Since you are not tied to any specific HTML/CSS structures, you have lots of freedom in designing the look and feel of the tools. When designing the presentation of these tools or basically anything on the web, you have three important but different approaches to choose from. Now think of designing a rounded box for any content or a tooltip background for example. You have to choose one design pattern and stick with it. Here are the advantages and disadvantages of these choices:
1. CSS-based design
This approach depends primarily on CSS for the presentation. You'll use background colors, border colors and styling, web fonts and have only minimal use of graphics.
- limited visual control. There are lots of things you can tweak with CSS, but in the end they are limited and you simply cannot do everything with them.
- scalable size. Your elements can stretch horizontally and vertically without problems.
- maintenable. You can easily change the design just by editing a few lines of code.
- lightweight. CSS files are text which means that they can be downloaded much faster than images. CSS files can also be compressed and GZIPped which makes them even faster.
There are lots of new features in the latest CSS version such as rounded borders, gradient borders, shadows and opacity, but these are not yet supported by every major browser. Some of the demos on this site uses these CSS3 features. If you are using Firefox 3.5, Safari 4.0 or other CSS3 compatible browser please take a look at the scrollable gallery with tooltips demo and click on the thumbnails. You'll see nice looking drop shadows on the overlay. As you can see you can create stunning looks by only using CSS and the design will also be well-behaved in older browsers.
2. Image-based design
In this approach you'll typically use a single background image that is optimized for the purpose.
- Best visual control. Your design will look exactly how you want it to look. No compromises.
- Fixed size. Your elements' width and height is fixed. You have to optimize the content to fit inside elements and for excessive content you must rely on scripting or scrollbars.
- Heavy. More kilobytes to download and more requests to the server. Heavy use of images will slow down your pages.
3. CSS and image-based design
With this approach you'll use a lot of CSS tricks together with multiple background images.
- Best of both worlds. Scalable elements that look good.
- Lots of work. You must master CSS, and a tight integration with the graphics designer is needed. This approach requires more planning.
jQuery Tools allows you to use any of above approaches and it does not restrict you to any hard-coded CSS coding or theming frameworks. Our demo area contains examples of all these approaches, but we mainly use the second approach. We typically use a single background image to demonstrate the tool in an appealing manner. We also offer you a lot of different general-use background images that you can use as the basis for your own design.
PNG-24 format
This website uses a lot of semi-transparent PNG-24 images which are not natively supported by IE6.
Because of this and many other huge limitations in IE6 all major players such as YouTube are dropping the support for IE6. Having said that we can get to the real point.
When saving your web graphics, you should really consider using the PNG-24 file format. It has support for alpha transparency. This means that you can use any kind of opacity setting on your image. It's like working with Adobe Photoshop's layers. You can layer multiple PNG images on top of each other and there is lots of room for experimentation. Below you can see two images. The gray box is a PNG24 image with alpha transparency.


If you are not using IE6 you can see the eye through the PNG24 image. Many sites don't yet take full advantage of this wonderful graphics format.
Internet Explorer 6.0
Alpha transparency is not natively supported by Internet Explorer 6.0. It is possible to make it work in IE6 by using the IE-proprietary AlphaImageLoader filter but, according to recent studies by Yahoo, this technology should be avoided. The problem with this filter is that it blocks rendering and freezes the browser while the image is being loaded; it increases memory consumption and is applied per element, not per image, so the problem is multiplied.
You'll definitely get the most reliable results by using GIF or JPG images in place of PNG images on IE6. You can override this in your CSS as follows:
  #myelement {
  background-image: url(corner.png);   /* all browsers */
  _background-image: url(corner.jpg);  /* IE6 only */
  }
The initial underscore is a hack that causes the CSS setting to be applied only to versions of IE older than 7. You may have the patience to do this, but I don't.
PNG24 and opacity in all versions of IE
If you programmatically change the opacity of a PNG image in all versions of Internet Explorer it will cause ugly black borders around the image as seen in this screenshot:

This bug makes it impossible to make fading animations with PNG images in Internet Explorer. For this reason the Tooltip "slide" effect uses opacity fading in every browser other than in IE. This is the default behaviour but you can of course change this if your tooltip is not decorated with PNG graphics. Take a look at the Tooltip front page and look at the first demo in Firefox and then in IE. The tooltip fades in/out in Firefox but uses the sliding effect without opacity changes in IE.
This "black box" bug can also happen in situations where a PNG image is placed on top of a transparent layer. I noticed this happening in this demo.
Including the Tools
The first thing you must do is include the tools on your pages. You can place the following statement on your page and you are ready to go:
http://cdn.jquerytools.org/1.2.6/full/jquery.tools.min.js
This will include the tools on your page with maximum performance. We are offering this high performance content delivery network (CDN) for free. You can use it in production environments. Enjoy!
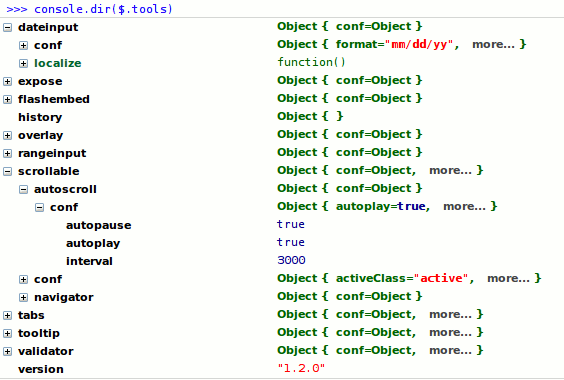
If you are using Firebug or similar JavaScript debugger you can easily test which tools are included and what are their versions by running the following command from the console:
console.dir($.tools);
You'll see following kind of result

You can see each tool you have included and the version number. If you drill down a little deeper into these global settings you will see each tool's default configuration values (a good source of "documentation"!) which are discussed more extensively in the important global configuration section.
Initializing the Tools
After the needed tools are included on the page, you need to initialize them. All tools follow the same pattern. Initialization always starts with a jQuery selector followed by the tool initialization function (constructor) and its configuration object. Here is an example using the scrollable tool:
  // initialize tools.scrollable with configuration variables
  $("#wrap").scrollable({
  keyboard: false,
  circular: true
  });
This will make all elements scroll that are contained within an element whose id is "wrap". Next, comes a tool constructor named scrollable which takes a configuration object as an argument. This object defines the settings for how we want our elements to be scrolled. This example above illustrates the general way you will initialize all jQuery Tools.
Return value
The constructor will always return the jQuery object that is a collection of the elements that are selected by the selector. This is how all proper jQuery plugins are recommended to behave. Again we use the scrollable tool as our example:
  // return elements specified in the selector as a jQuery object
  var elements = $("div.scrollable").scrollable();

  /*
  now you can continue working with the jQuery object. you can,
  for example, add new plugins and use built-in jQuery constructs
  */
  elements.someOtherPlugin().onClick(function() {
  // do something when this element is clicked
  });
Using global configurations
Although you can change the default settings of the tools by supplying a configuration in the initialization phase you may be using the same configuration settings over and over again. In this case you may want to change the default configuration variables for the tools so that you don't need to specify the same setting every time. Here is an example of a global configuration setting:
  // all overlays use the "apple" effect by default
  $.tools.overlay.conf.effect = "apple";
Afterwards you can simply do this:
  // "apple" effect is now our default effect
  $("a[rel]").overlay();
Of course you can override these default settings just like before:
  // override the global configuration setting
  $("a[rel]").overlay({effect: 'default'});
Every tool has a global configuration under $.tools.[TOOL_NAME].conf. For example $.tools.tabs.conf. You can change many global settings simultaneously by using jQuery built-in $.extend method as follows:
  $.extend($.tools.overlay.conf, {
  effect: 'apple',
  speed: 1000
  });
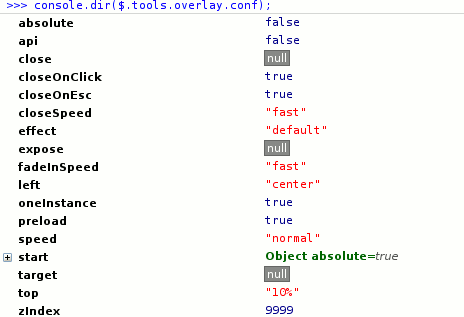
The list of various configuration settings can be found on each individual tool's documentation page. One important thing about the global configuration is that it provides you a good source of "documentation". Try typing the following command into your Firebug console:
console.dir($.tools.overlay.conf);
And you should see the following information appear:

Here you can see the available configuration options and their default values. Very useful.
Using jQuery Tools plugins and effects
jQuery Tools is the first framework to take full advantage of jQuery's powerful chaining technology. Here is an example of a chaining pattern:
  // initialize a few scrollables and add more features to them
  $(".scroller").scrollable({circular: true}).
      navigator("#myNavi").autoscroll({interval: 4000});
You take one or more .scroller elements from a page and make them scrollable. The scrollable tool has only the absolute necessary features to make things scroll. If you want to have more features you can use plugins. In this example we used the navigator plugin to setup a navigator beside the scrollable. The autoscroll plugin makes the items scroll automatically without any user interaction.
You can have multiple scrollables on the page and they can all be activated with this single line of code. All plugins may have their own set of configuration variables and they can also be set from the global configuration.
Almost every tool has a few plugins that can be downloaded from the download page. This kind of design pattern makes the overall file size dramatically smaller because you can only use the things you need. It also makes the code more organized and easier to understand. In the programming world this pattern is called a decorator pattern which is at the heart of jQuery: "take a bunch of elements from a page and do stuff with them". jQuery Tools takes this seriously and goes a step further than other libraries.
Every tool has a built-in plugin architecture and you can easily write your own plugins.
Effects
Tabs, tooltip and overlay have a unique "effect framework" which enables you to change the default behaviour of each tool. Here is an example:
  // use the "apple" effect for the overlays
  $("a[rel]").overlay({effect: 'apple'});
This configuration makes the overlay use an effect called "apple" which makes the overlay work as you may have seen on Apple's website. The purpose of the effects is to change the default behaviour whereas plugins enrich or add new features. In the case of the overlay the actual tool provides the basic functionality of overlaying such as initialization, keyboard and mouse interaction and document masking (with the mask tool) while the only job of the effect is to perform the opening and closing actions of the tool. This makes it fairly easy to implement different kind of effects. This design pattern makes the code more organized and makes the overall file size smaller just like the plugins.
Some tools have many built-in effects and some have only one. You can also get more effects from the download page. You can set the default effect in the global configuration so that you don't have to explicitly supply it to every initial configuration.
Writing your own effects
Look at each individual tool's documentation for more information:
- Writing effects for Tabs
- Writing effects for Tooltip
- Writing effects for Overlay
- Writing effects for Validator
Note: it is possible to define custom configuration variables for your effect by extending the global configuration. Say you have a custom overlay effect with the configuration property explosionSpeed; you can give it a default value as follows:
$.tools.overlay.conf.explosionSpeed = 500;
After that the users can either use the default value or override it from the overlay configuration.
