
Minimal setup for overlay
Below you can see two images that launch overlays. There are two terms being used: the trigger is the element that launches the overlay and the overlay is the element that is being positioned on top of the page.

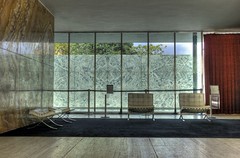
The Barcelona Pavilion
Barcelona, Spain
The Barcelona Pavilion, designed by Ludwig Mies van der Rohe, was the German Pavilion for the 1929 International Exposition in Barcelona, Spain. It was an important building in the history of modern architecture.
Several critics, historians and modernists have declared it "the most beautiful building of the century"

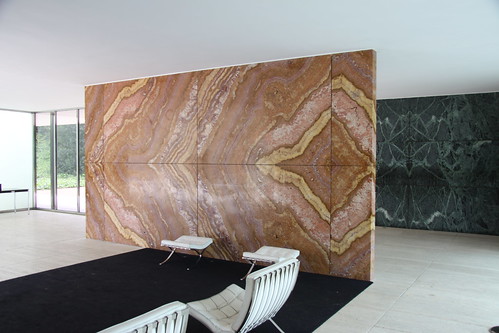
The Barcelona Pavilion
Barcelona, Spain
Another unique feature of this building is the exotic materials Mies chose to use.
Plates of high-grade stone materials like veneers of Tinos verde antico marble and golden onyx as well as tinted glass of grey, green, white, in addition to translucent glass, perform exclusively as spatial dividers.
HTML code for the triggers
First we define the triggers as follows:
<img src="thumbs/barcelona-pavilion.jpg" rel="#mies1"/>
<img src="thumbs/barcelona-pavilion2.jpg" rel="#mies2"/>
These triggers have a reference to the overlay element in the rel attribute. This attribute is a jQuery selector that selects the overlay being used. A typical selector selects one element that has a unique id. For example, #mies1 selects an element that has an id of "mies1".
You can have one or many triggers on the page and each can reference the same or different overlays.
Note: we used a button tag here but you can use any element as a trigger as long as it has the rel attribute. A typical scenario is to use a tag with the rel attribute and a nested img tag.
HTML code for overlays
Now we need the overlays:
<!-- first overlay. id attribute matches our selector -->
<div class="simple_overlay" id="mies1">
  <!-- large image -->
  <img src="photos/barcelona-pavilion-large.jpg" />

  <!-- image details -->
  <div class="details">
    <h3>The Barcelona Pavilion</h3>
    <h4>Barcelona, Spain</h4>
    <p>The content ...</p>
  </div>
</div>

<!-- second overlay -->
<div class="simple_overlay" id="mies2">
  ...
</div>
The overlay can be any HTML elements but the div is most commonly used. The overlay can contain any HTML including forms, images, Flash objects and JavaScript widgets and it is totally up to you how you structure and style it. This is why this tool is so flexible. It allows you to visualize both the overlay and its content. Just use your imagination.
CSS coding
Here is the styling for the overlayed element. There are a couple of things you should note here:
- We have not used any images at all. Everything is pure CSS. This gives us the ability to change the dimensions of the overlay dynamically. The overlay's height is dynamically adjusted to the height of the elements inside the overlay.
- We have used some CSS3 rounded borders and drop shadows. These settings will make the overlay look better in most recent browsers without harming older browsers. This is known as "Progressive Enhancement with CSS".
- We have styled the close button although it is not in our HTML structure. This button is automatically generated by the overlay tool with the class name close. You can alter this in the configuration.
- You can use absolute positioning of the elements inside the overlay and those elements are positioned relative to the overlay element. This is because the overlay is also absolutely positioned. This is how CSS works.
- Since the overlay is absolutely positioned it is in most cases placed on top of the page. However if you have other absolutely (or relatively) positioned elements on the page they may appear over your overlay. You can use the z-index parameter to layer your elements properly. An element with a higher z-index is placed on top of an element with a lower value.
/* the overlayed element */
.simple_overlay {

    /* must be initially hidden */
    display:none;

    /* place overlay on top of other elements */
    z-index:10000;

    /* styling */
    background-color:#333;

    width:675px;
    min-height:200px;
    border:1px solid #666;

    /* CSS3 styling for latest browsers */
    -moz-box-shadow:0 0 90px 5px #000;
    -webkit-box-shadow: 0 0 90px #000;
}

/* close button positioned on upper right corner */
.simple_overlay .close {
    background-image:url(/media/img/overlay/close.png);
    position:absolute;
    right:-15px;
    top:-15px;
    cursor:pointer;
    height:35px;
    width:35px;
}
Here is the simple styling for the .details element inside the overlay that shows the description of the image:
  /* styling for elements inside overlay */
  .details {
  position:absolute;
  top:15px;
  right:15px;
  font-size:11px;
  color:#fff;
  width:150px;
  }

  .details h3 {
  color:#aba;
  font-size:15px;
  }
JavaScript coding
This is by far the easiest part of this setup. We simply select the trigger elements and enable overlaying without any additional options:
$("img[rel]").overlay();